Monday, January 30, 2012

The Chickens Have Landed!

Thanks to some hard work and a dose of serendipity, I found a flock of organically raised hens that needed a new home. Voila!

Alright, did you spot the duck?  Yes,  one duck came with the flock.  Why a duck?  (insert Groucho Marx humor)

Slug deterrent!  There's also a guinea hen, but it was camera shy.  Here are a couple of the ladies.  The Barred Rock is the one with black and white stripes.  Rhode Island Red is just behind her.

They're not too keen on the snow though.  There are now various branch "boardwalks" to good scratching areas.

There we go!  Mostly Rhode Island Reds, a few Barred Rocks, a few Arucanas, and some mystery birds along with a duck and a guinea hen.  It's a motley crew, but they're going to play some very important roles on farm.

Thursday, January 26, 2012

Preparing the fence

Working in the shed by the light of the trusty old Coleman lantern, I got the fence wired up to the solar panel and battery.  And I didn't zap myself!

Wednesday, January 25, 2012

Coop assembly

Got all the parts out to the farm.
Started reassembling, just like at Justin's.
That's the stash of bean poles in the background.
Along the way I made great use of my "Yankee Screwdriver."  This fine device will drive screws with relative ease, and uses no electricity.  You may have seen a device like this in some Mission Impossible movie where they bust into an elevator control box.

 I do have a battery powered cordless drill out there, but with one battery and some distance to a charger, I use it with prudence.

Walls are up


Roof almost done

Hey it's a coop!  Could use a little paint though...

And the back side.  With skylight for human and chicken utility.  The whole roof is a bit big.  It keeps the coop walls less exposed to the elements, but it also provides more shelter around the coop when the chickens are foraging.  

This coop is based on one I designed for my previous flock.   There is a wide vent along the low back wall, and then vents high on the front wall.  The warm air rises, and exits the upper vent, fresh cool air comes in the lower vent.  When it's cold outside, I close the lower vent.  Humid air can still rise out the top (preventing frostbite on combs) but there is less airflow so the chickens can stay warmer.
The skylight works great to illuminate the inside of the coop for me and for the chickens.  They key in on light levels to lay eggs, so I don't want to keep them in a dark box.  When the sun is up, they're up!

Tuesday, January 24, 2012

Coop preliminary assembly

Here are the types of components I'm building for the coop.  Wall sections complete with screening that can be fastened to the base.


I got all the parts cut.  Just tacked things together to make sure it fit.


All of it is now disassembled, and laying flat in the back of my truck.  Tomorrow is assembly day!

Sunday, January 22, 2012

Coop parts

Gathered up supplies to build a chicken coop today.
My friend Justin is graciously lending me space in his barn to do preliminary assembly.  I'll build in sections that can lay in the truck and then transfer out to the fields.

Friday, January 20, 2012

Fun With Numbers! (and other odd skills)

My commute today.  No complaints.


Today I did a bit of theory, then some field studies and a little engineering to support this agricultural endeavor.

As per previous posts, I'm working with a gravity fed water system.  I know I can get water to the field, but can I get water to the plants.  (yes, that's different!)
I could carry water in a bucket,..  and that's no fun.  I would like to use drip irrigation because it's efficient with water, and does not get the foliage wet because that encourages diseases.  (Drip tubing is a flexible pipe, with little holes punched in it along the way.  It lays on the soil the entire length of the bed, and the water drips out right where the plant is located.  There is very little chance of it evaporating before the plant gets to use it.  As opposed to an overhead sprinkler system which sprays excess water everywhere.)

Most drip systems start with a hose connected to your standard well pressure of  40psi, but it gets put through a regulator to reduce the pressure to around 8-10psi before entering the actual drip tube.  It's not so much pressure that the tubes will burst, but enough pressure that there is a uniform release of water from very tiny holes.  I have nowhere near 40psi, and probably don't need a regulator.  But how much pressure do I have?  Is there enough pressure? 

Water will gain 0.4335 psi for every foot that the source is above the discharge.  (elevation)x(0.4335)=psi

This is a handy cheat sheet for that calculation.
http://www.accontrols.com/documents/FeetHeadofWatertoPSI.pdf
  
Yowza!  I need my water tank 20 feet above my field to get a little over 8psi.  I'm not building a water tower.

Time to survey.  Budget style. Professional surveyors, look away now.  Kids from the Dartmouth geology program (The Stretch) take note.  This is a pretty sweet skill revival, and hack.

 Here's a 10 foot stick, with 6 inch increments.  

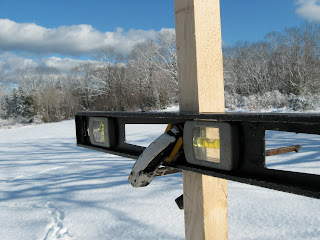
And a second stick, quick clamp, and a level.

Measure out distance along the ground (so i know how much tube I need to buy) and put the 10ft stick in the snow.


Make the level... level.  Sight along the level pretending that it is a fine piece of optical equipment that allows you to see the tiny numbers scrawled on a piece of wood.


Note the far measurement which is in line with the level, and then subtract where the level is clamped on the stick.  Walk over to the other stick and leapfrog to the next location.

And write it all down, so you can add up the cumulative elevation gain.

Turns out the most convenient place for a water tank will only give me 2.5psi.
But, there is a little hill near where my water line comes up from the pump.  After surveying, I found that it is 26 feet above the top of the field.  Fantastic, that's a little over 11psi.  I do have to add 200 more feet of pipe from the tank to the field.  Also it's raising the water from the pump 17feet more.  That's extra work for the ram pump, so it will cut down on flow to the tanks...  But, everything is frozen right now, I know the drip tube can work, I've got the measurements I need to order drip tube and pipe, so let's move on to something else!

Wednesday, January 18, 2012

Scheming

Big fan of Sketchup.  These are some chicken coop ideas I have been messing around with.  It's way easier than paper and pencil (oh no, we've entered the future), and you can take each component, and figure out how to cut it from a single piece of plywood.  I'm still cruising craigslist to repurpose an old shed or trailer though.  

These will mostly stay in one place, and I'll move the fencing around them as the chickies forage.  But these coops are small enough to drag to an entirely different area of the field to give them fresh greens.

That's what I've been doing...planning structures, working on putting together a seed order.

Thursday, January 12, 2012

Winter work


More brushing, but with snow.


View to the north with snow.  Hoop house sheds some snow on the sides.  But it piles up in the middle.  After I was wet and cold I went in the hoophouse to work.  It was about 38 degrees in there.  10 degrees warmer than outside.


I finished up another bench made of pallets for seedlings.

It's interesting working in the hoop house with the roof is covered in snow.  Sort of like being in a snow cave.  But it was really starting to pile up, so I knocked off the snow from inside.  Very fun.


Wednesday, January 11, 2012

More brushing...

More brushing.  More crazy piles in the truck.
Doing this brushing has two handy benefits:
1- It exposes the south edge of the field to more early season sunlight.  The soil should heat up more quickly in the spring, which means more veggies earlier!

2 - The main trunk of these brushy trees are just a few inches in diameter.  Perfect for bean poles, and tomato trellises.  Thats some local sources of materials!

3 - Oh yes, there's a third.  All the branches and whatnot I'll chip up to make litter for the chickens.  Deep litter method anyone?  (Chicken poo is high in nitrogen, wood is high in carbon, combine the two and it becomes great compost)

Perhaps I'm looking at these side benefits because I feel guilty cutting down trees.  Don't worry!  I'm keeping all the carbon right here.  

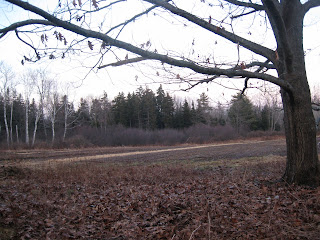
Note the near border of the field is less shrubby... Ah, you can't really tell here.  But it is another snapshot of the field mid January.


Over the holidays I picked up an old Coleman lantern from my folks basement.  (no electricity out at the farm.)

Coleman lantern collectors clubs take note:  It's a Coleman model 275, circa 1976.  From Bradlees (now defunct department store.)  Had to replace the knob though, now it's a block of wood that  conveniently indicates nothing in terms of whether it is shut off or not.  Just have to listen for the gas.

This little bugger lets me work at the farm later into the evening.  Not sure that's a good thing...
It does make the hoop house look neat at night.

Tuesday, January 10, 2012

Hoophouse Benches

The plan for the hoophouse is to have part of it partitioned off for seedlings and potting.  The rest is for plants growing in the ground.  Time for benches!  It gets the seedlings up higher to a warmer part of the house, and then I don't have to bend over.  But they're going to get all wet and soil-ey, so I don't want to use nice materials.  I ended up with some pallets from outside of the Shipyard Brewery.  They all smell vaguely of beer ingredients...

Voila! 
 I've built prettier tables.
And I've built more functional tables.
But I've never built such a cheap table!
And, it's pretty, functional...

 (50cents worth of screws?  maybe?)

And they'll be another bench over here.  Sooner or later.


Friday, January 6, 2012

Say,...what's that in the rear view?


Auuuuuugh!  Sandwich Monster!


Oh, it's a pile of insulation.  Whew!


It seems that most of my tasks so far have involved trying to stuff absurd things into the back of my little truck... and today was no different. 

I headed up north to pick up a bunch of salvaged R28 foam insulation for the future vegetable cooler.  It's 4 inches thick, 4 feet by 8 feet.  This is way more insulating bang for the buck than I could have gotten from the big orange box store, and I'm recycling it.  Warm fuzzies all over.
It feels odd designing/building the veggie cooler now when it's so damn cold out, but if I can't grow things, I better use my time to build things.

Sunday, January 1, 2012

Brushing

Happy new year!
We've left the last of the binary years behind.
(ya know.  100111 and so forth)  uh, anyway...

Meredith and I spent a lovely afternoon hauling brush away from the edge of the field.
All of this stuff:


Got hauled to the far edge of the field.


More space!   Less brush!  Less habitat for veggie & people pests!
Can't wait to hang a hammock under that limb.