Woo! roof is on, walls are closed in. This thing is ready for winter.
All the plastic on the sides is secured with "wiggle wire." It's a springy bit of wire that sits in a channel and squeezes the plastic against the sides of the channel. Here is a closeup.
Part of finishing the greenhouse was adding the hardware to allow the sides to roll up to allow cool air in the sides, and let hot air out the doors. This is the greenhouse in "Hot Weather Mode." Tomatoes! Basil! I can taste em already.
And the view from inside:
Well, all this got done at the shortest days of the year. Days are getting longer already!
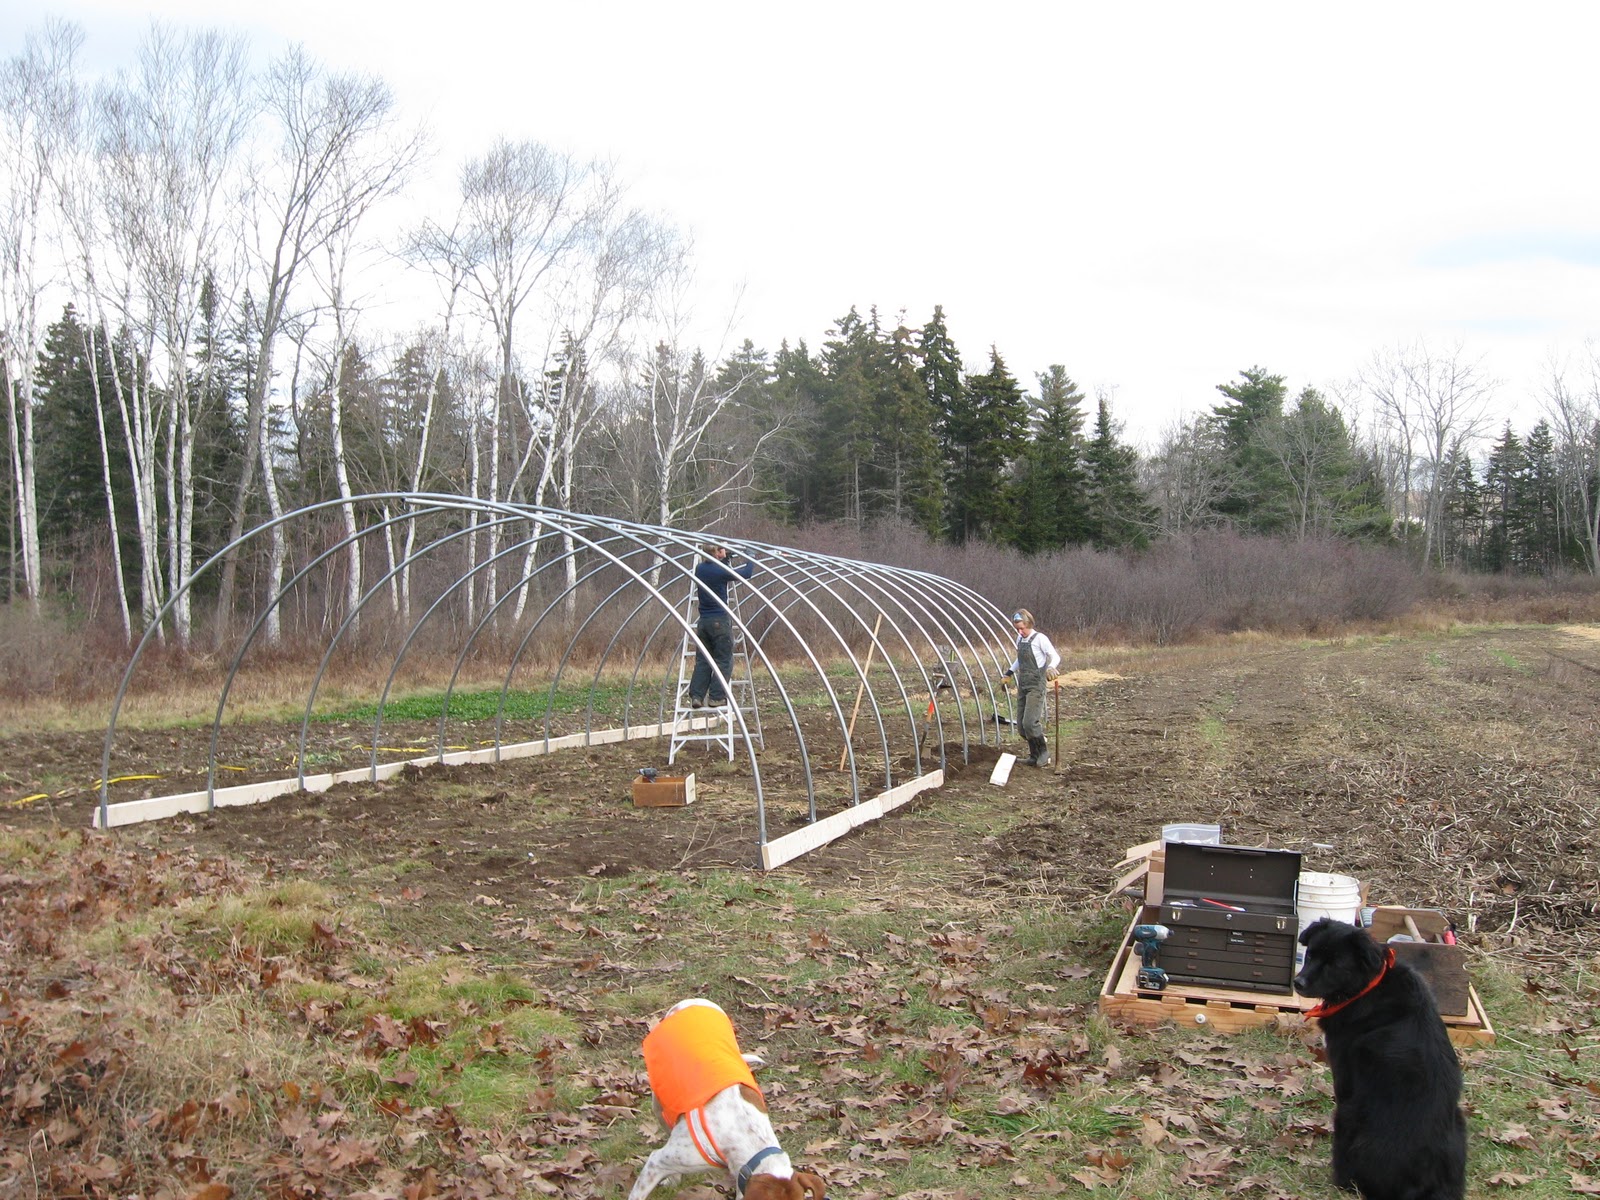
Weather forecast said mid 40's, low wind, sunny. Perfect weather to pull a giant piece of plastic over the hoops. It is generally recommended to do this with 4+ people, but I found out it can be done solo!
I also cheaped out on purchasing a "double layer" roof, because the plastic comes in a 100' roll. Ostensibly, 50 feet goes to the roof, and the other 50 goes to the end walls. But instead I doubled over the 100' roll, and I'll use some recycled plastic for the ends. The double layer roof will add a bit more insulation and add to the longevity of the roof. Only thing is, it's a 48' greenhouse, that leaves me with ~1foot to hang over the ends. Given the uneven ground, and wiggly nature of this whole contraption, here's hoping it all fits.
I rolled out the plastic, and doubled it over. looks like it reaches where it's supposed to go.
Then I tied ropes to tennis balls under the plastic, and started pulling it over the top.
There was much running up and down the length of the greenhouse to pull the plastic straight. Tug here, tug there, pull it back the other way. Check all the corners. Do I have enough to close up the sides? Pull it back again, etc. etc.
Voila! With 2 inches to spare on the sides, it all fit very nicely. It almost looks useful!
After a bit of inclement weather (and some side adventures,) it is time for the doors. But how does one hang a door single handedly? Call up a friend. Rob to the rescue!
I wanted the doors to be nice and wide so I could bring in wheelbarrows and a rototillers easily. Also wide enough to come out of the doors with an overflowing crate of produce. (oh yeah, it's gonna happen). Lastly, they will serve as super large vents on either side when this thing is going in the summer. The big end-venting doors, combined with the roll-up sides should give me good environmental control, and allow hot air to rise out from the ends. All this without any electricity! (no air moving fans here). These doors are ~4' wide ~7' tall.
Rob and I framed two doors flat on the ground, and made sure they were square and stable. Then stood em up for display.
Then we carried them over the end walls, shimmed the bottom of the door with sticks and rocks to close the gap at the top edge of the door. A quick clamp worked well on the hinge side to keep that side of the door parallel to the frame. A few screws, and a bit of digging below the door, and we're up!
I framed in the end walls today. They attach to the bows with these nifty brackets.
It required a bit of digging to get them to hang correctly off the frame since the baseboard gets partially buried to make a good seal around the edge. Unfortunately it got pretty cold last night and the ground nicely frozen for the better part of the day. (I guess it IS December...)
Some areas with more moisture in the soil made those beautiful frost heave things. (I'm sure there's a technical name for this.
And the end walls are up! These will get covered with plastic .
Less charismatic progress also got done. I installed the goofy 'wiggle wire' channels that hold the plastic down on the sides, and all the brackets are secured to the bows with fancy self tapping tek screws. That gaping hole at either end will be a door comfortably wide for a wheelbarrow. Soon enough!
Also drained the water system now that I know it works. I arrived this morning to frozen pipes, but they thawed out by 2pm in the 40 degree weather.
I'm off to the New England Fruit and Vegetable conference for a few days. Got more learnin' to do!
Yowza! It's coming along. Thanks so much to Justin, Brian and Meredith for the fantastic help! We'll shoot for getting the wiggle wire channels in tomorrow. What is wiggle wire you say? It's nifty bracket that holds the clear plastic to the hoop house frame with a wiggly piece of wire, in a channel. C'mon that's totally not a self descriptive definition...
So, the water system has been occupying my mind for a while, here's the stream of consciousness process of how it came about:
I prioritized setting up and testing a water system this fall because watering will really help the new sprouts take off, and beat the weeds. The greenhouse and chickens will need water for sure. There is going to be a lot to deal with in the spring, so I'll set it up, make sure it works, and then drain and disassemble for the winter. Right, so I've got two 275 gallon tanks, 550 gallons of total water storage. So where's that water coming from? Well, there is a pond a short drive away, and I could put the tank in the back of the truck, get a gas powered pump, fill it, drive it back, unload... uh... 275 gallons of water, times 8.3lbs/gal. Thats 2,282 lbs, and I don't really want to put that in the truck, or buy a trailer, and shuttle this back and forth. So, electric pump and a hose? Nope, no electric there. Solar panels? Yeah, but panels, a charger, a battery get real expensive, real quick. The solution: A ram pump!
Ram pumps: a neat device invented in the late 1700's that uses the inertia of a water hammer to pressurize an air tank, which pushes water up hill. No external power sources is needed other than the falling water. Going old school here, like, centuries ago old school.
There's a small creek below the field, with a very slight drop, but it's just enough.
First step, build a dam with a pipe in it. This will provide the large amount of flow required for the pump to function.
The drive pipe is the 1.25inch pipe coming out of the pool. It then snakes down the stream bed for 50 feet. The PVC flexes just enough to get around bends in the creek.
Then the next day I built and installed the pump at the base of the drive pipe.
All that goofy stick scaffolding is to prop up the air chamber. Water flows in at the far end, slams the brass valve shut, compresses the air chamber, and then gets shot down the delivery pipe. Observe in action!
And then it fills up my water tanks overnight!
So, water supply problem solved. Next to tackle water distribution.
So the old field has had a honeysuckle invasion on the perimeter. I've been hacking that back an hauling it farther into the woods. It gives some more working room and lets more light to the tilled soil. This is solar powered food here!
That plastic cube to the right is one of two 275 gallon bulk container which will be the water supply for the farm. Oh yeah, did I mention there is no electricity and no water at this farm? We'll see how to get around the few times where electric and water are needed on the farm.
Thanks to the generosity of Mary Ellen and Austin of Green Spark Farm, I'll be able to start a farm this fall!
There's about one acre of land, in Cape Elizabeth which I'll be maintaining in organic agriculture, and growing my own stuff. Neat.
Austin tilled about 3/4 of the acre mid-November, and I got the garlic in just before thanksgiving. It may not look like much, but that line of straw is gonna be garlic!